Thursday, February 25, 2010

Pork and Kimchi Rice Bowl (豚キムチ丼)


Experiment:
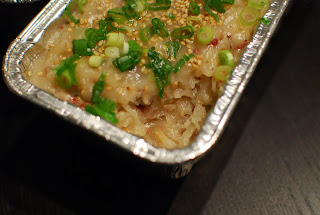
Pork and Kimchi Rice Bowl (豚キムチ丼)


Introduction:
Last weekend, Mr. Clam and I went Downtown to watch some Olympic stuff. We went in a restaurant called “Ebi Ten” fo food. There I tried a rice bowl called “Buta-Kim,” and I REALLY LIKED it! When I was eating it, I thought to myself… “It shouldn’t be too hard to make at home…” So I gave it a try tonight.


Material: (serve 2-3)
200g thinly sliced pork
100g kimchi
1/4 onion, thinly sliced
1/2 tbs chopped garlic
2 tbs chopped green onion
Oil
Mayonnaise
Egg (optional)

Rice
Small pieces of lettuce

Sauce:
1 tbs mirin
1 tbs sake
1/2 tbs soy sauce
1/4 tbs sesame oil
1/2 tbs brown sugar
Salt

Procedure:
1) Mix all the sauce ingredients in a small bowl.

2) Heat up a frying pan, put some oil and chopped garlic in. Then put the onion in. Stir fry until the onion is brown and soft.

3) Put the pork in. When the pork has changes colour, put in 1) and the Kimchi. Stir fry until the pork is well cooked.

4) Now it’s time for the rice. First put the rice a rice bowl, then put some lettuce on top. Ok, now it’s time for the trick – MAYONNAISE! I never thought of putting mayonnaise in a rice bowl until I tried it at Ebi Ten. So remember to put some mayonnaise in your rice bowl! It makes it taste SO much better! 


5) Now, if you like eggs like me, you can put a sunny side up egg on your lettuce. If you don’t like eggs, then you can skip this.

6) Of course, now you’ll need the kimchi pork! Just simply put the pork on the lettuce, and green onion on top of the prok. Viola! There’s your Pork and Kimchi rice bowl!


Results:

Without egg:
 

With sunny side up egg:

Discussions:
1) It was suprisingly good! And the good thing is it doesn’t take long to make! I think from cutting the onion to the finished product, it took me less than 20 mins.

2) I think I’ll start to put mayonnaise on EVERYTHING now coz it tastes so good!


Wednesday, February 24, 2010

Stir Fry Daikon Cake with XO Sauce


Experiment: Stir fry Daikon Cake with XO sauce


Introduction:
I tried to make the Daikon Cake again. This time I tried it with Rice Flour:Corn Startch 2:1 ratio, but then... it turned out to be quick firm. Still not the texture I want. BUT! Since this is so firm, it's actually quite good for stir frying. So today I tried stir fry daikon cake with xo sauce - a common dish now in many dim sum restaurants.

Materials:
Daikon cake
A bunch of bean sprout
2 -3 tbs XO sauce (depends on how spicy you like it)
1 tbs of chopped garlic
Chopped green onions
Pepper, salt to taste
Oil

Procedure:
1) Cut the Daikon Cake into cubes.


2) Heat up a frying pan, then some oil, and then add the chopped garlic. When the garlic turns golden brown, put the bean sprouts in and stir fry for a bit.


3) Put the daikon cake in and stir fry with the bean sprout. Then put the XO sauce in. Add salt and pepper to taste. Mix well.

4) When the daikon cake is well cooked, put everyone on a plate and sprinkle grenn onions on top.

5) Time to eat!


Result:


Discussion:

1) Just in case you didn't know what XO sauce is, it's a seafood sauce that's usually made of chilli pepper, dried scallope, dried shrimp etc. It's usually spicy. You can find it in most Asian supermarkets.

2) I think I put too much oil from the XO sauce in... so the whole dish turned out to be quite greasy. Not good.

3) Hmm... About the Daikon Cake I think I'll try a Rice flour:Corn Starch 3:1 ratio... Wish I'll succeed next time!

Saturday, February 20, 2010

Inari sushi


Experiment: Inari sushi


Introduction:
I usually cook noodles on weekend (noodles is quick!), but Mr. Clam complains that I cook too much noodles lately and he wants rice for dinner. I opened the fridge and see what I can make, and I found that I didn’t have a lot of food left. I saw that there’s a pack of aburaage (leftover from the mochi-kin from Oden.) So I decided to make Inari sushi.

Materials:
5 aburaage (Deep fried tofu pocket)
2-3 bowls of rice
White sesame

Sauce:
1 cup of dashi stock
1 tbs soy sauce
1.5 tbs sugar
1 tbs mirin

Procedure:
1) Boil a pot of water. When the water boils, put the aburrage in water and boil for about 2 minutes to get rid of the oil. Then take the aburaage out and drain out the water.


2) Cut the aburaage in half, and open the pocket. Be careful not to tear the pocket. (I tore one… >.<) You’ll then have 10 small pockets.


3) Put all the sauce ingredients in a pot and bring to boil. Put the aburaage in the pot and turn down the heat. Simmer for about 10-15 minutes, or until the sauce is almost gone.


4) Take the aburaage out and drain out the sauce.

5) Mix sesame seeds with rice. I like sesame seeds a lot so I put quite a lot in. Anyways. After you mix the sesame seeds and rice, put the rice into the aburaage pockets (be careful not to tear the pocket here!).

6) It’s READY!

Result:


Discussions:

1) You can put chopped carrots and shitake mushroom in the rice as well so that the inari sushi has more flavour.

2) One piece of inari sushi is actually quite a lot of rice! I was surprised how quick the inari sushi used up my 3 bowls of rice.

Wednesday, February 17, 2010

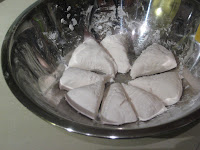
Chinese Radish Cake (蘿蔔糕)


Experiment: Chinese Radish Cake
Introduction:
I saw in my friend’s facebook that she made Radish Cake last year. I was sooo tempted to make it last year, but then… since it involves MANY steps, I was quite reluctant to do it. This year, since I have time in my hands, I decided to give it a try. I’ve done my research – I went to MANY recipe websites. But very interestingly, the flour proportion vary from site to site. In the end… I just randomly put the two types of flour together… in the end… It was too sticky. Hmm… I’ll definitely try it again (when I feel like it). But anyways… here’s what I did…

Materials:
1.5 Chinese white radish (about 800g)
2 shallots
2 dried scallopes, pre-soaked in water
5 dried shitake mushroom, pre-soaked in water
2.5 Chinese sausages
2 tbs Chinese dried shrimp, pre-soaked in water
A bunch of green onion, chopped
Sesame
Rice Flour
Corn Starch
Oyster Sauce
Sake
Grounded white pepper
Oil

Procedure:
1) Cut the shallots, dried scallopes, dried shitake mushroom, Chinese sausages, Chinese dried shrimp in tiny pieces.


2) Shred the radish. When you shred the radish, water will come out. Don’t pour out the water, you’ll need it for later.

3) Heat up the frying pan. Put the Chinese sausage in first, the oil from the sausages will come out. Then put in the shallots, dried scallopes, dried shitake mushroom and dried shrimp. Put this mix in a bowl when everything’s cooked.

4) In the same pan, put in the shredded radish. Fry for a while, and then add in 3), oyster sauce, sake and grounded white pepper, and keep stirring. When the radish becomes half cooked, turn off the heat.

5) In a small bowl, mix the rice flour and corn starch with the radish water. If you don’t have enough radish water, then just use water to substitute. I think I used roughly 500g of flour in total.
Ok this is the part where I had problem. I didn’t know what proportion of the rice flour and corn starch I should use… from lots of websites that I’ve read, I know that I should put more rice flour then the corn starch. So I just randomly mix them in. From the result that I got, I think next time I’ll try:

Rice Flour:Corn Starch
3:1

6) ANYWAYS… after you mix the flour with the radish water (mix it well!), pour it in the frying pan and mix it with the radish. Keep stirring. It’ll become thicker and thicker.


7) Brush oil all over the steaming container. Then put the radish mixture into the container. Then steam it for roughly 30-45 minutes.

8) Use a chopstick or skewer to poke into the center. If the radish cake doesn’t stick onto the chopstick/skewer, it means that it’s cooked.

9) While it’s still hot, sprinkle sesame and chopped green onions on top and let it cool.

10) You can either eat it steamed, or cut it into slices, and pan fry it.

Discussion:
1) Hmm… I acutally do like the taste of this radish cake… the bad thing is that it was toooo sticky, which is not good if you wanna pan fry it. I acutally liked to eat this batch steamed.

2) I cheated and used V-Slicer to “shred” the radish. People told me that the radish slices were too thick. I think I really have to SHRED! (Which means it’ll take me MUCH LONGER!)

3) I’ll defintely try to make it again!!!

Saturday, February 13, 2010

Glutinous rice ball with sesame filling 芝麻湯圓


Experiment: Glutinous rice ball with sesame filling 芝麻湯圓


Introduction:
It’s the Chinese New Year’s Eve today. Usually families gather together and eat glutinous rice balls. I usually buy rice balls in the supermarket, but since I have time this year (this year’s new year’s eve falls on Saturday!), I decided to make it myself.

Materials: (make about 20 glutinous rice balls)
150g glutinous rice flour
100ml warm water
1/4 cup grounded black sesame
1/4 cup sugar
1/8 cup unsalted butter (or pork lard)

Soup:
1.5 litre water
4-5 slices ginger
3-4 tbs black sugar

Procedure:
Sesame filling:
1) Mix the grounded black sesame and sugar together. Melt the butter, and add in the grounded black sesame and sugar mix. Stir well until it becomes a paste. Add more butter in if the mixture is not sticky, or add more gounded sesame and sugar if the mixture is too wet.

2) Use a small spoon to scoop the sesame filling into small balls, and put them on a plate. Make sure that you leave space between each filling.

3) Put the filling into the fridge for a few hours, so that it becomes harder, and easier to be put into the glutinous rice balls.

Glutinous Rice Ball:
4) When the filling is hard(er), you can start preparing the glutinous rice balls. Slowly pour warm water into the glutinous rice flour, and mix it WITH A SPATULA. Mix it into a dough ball. Pour more water in if the dough ball is too try, or add more flour in if it’s too wet.

5) Separate the dough ball into smaller pieces.


6) Roll the dough intoa small ball, the press ih the centre so that the centre is flat. Then put the sesame filling into the cente, and close the glutinous rice ball. Roll it into a ball again.

7) Boil water, and put the glutinous rice balls in. When the glutinous rice balls are floating, then they’re ready!


Soup:
8 ) Boil the 1.5 litre water. When water boils, put the ginger and black sugar in. Feel free to add more sugar if you like really sweet stuff.


Result:


 Discussions:
1) Make sure that you use unsalted butter, otherwise… it’ll be salty and sweet.
2) You can use raw sugar, cane sugar or brown sugar to substitute the black sugar.
3) Apparently using pork lard will make the filling smoothier… but… I think I’ll stick with butter.
4) If you can’t make the 20 glutinous rice balls at once, you can put them into the freezer. Just boil them (without difrosting) when you wanna eat again.

Thursday, February 11, 2010

Dace Fish Paste Omelette


Experiment: Dace fish paste Omelette


Introduction:
Dace fish paste was on sale at T&T this week, so I bought a tub home. I was thinking of making soup with it… but in the end I decided to make this super easy omelette since it’ll take less time.

Materials:
4 Eggs
Dace fish paste
A bunch of coriander
White pepper
Procedure:
1) Panfry the dace fish paste.

2) Take the cooked dace fash paste out from the pan, and then cut the fish paste into small(er) pieces.
3) Wash the coriander, and then chopped it into small pieces.

4) Beat the eggs, and then put the coriander and white pepper in.

5) Put the cut dace fish paste into a frying pan again.
6) Pour the egg mixture on top of the dace fish paste. Use a lid to cover the pan, and turn to low heat. Cook until both sides are cooked.


Result:


Discussions:

1) If you don’t like coriander, you can try using green onions to substitute it. I think that’s how my mom usually make it.

Thursday, February 4, 2010

Oden (おでん)


Experiment: Oden (おでん)

Introduction:
The very first time I had oden was in a convenience store, Lawson, in Tokyo a few years ago. I really liked the oden back then… probably because I was really hungry at that time… A few months when I went to Osaka, I was looking for oden in convenience stores. I thought ALL convenience stores have Oden… but it turned out that, only Lawson carries oden. So when I saw Lawson at Kyoto station, I went in immediately to get oden.


I always thought that you can’t make oden at home (uhh… not sure why but I have the notion that you can’t make food that are sold in convenience store), so I didn’t even bother looking for recipes. Until recently, my co-worker and I were talking about oden. She thinks that we can make oden at home. So I went to
cookpad to look for oden recipes.
It turns out that… it can easily be made at home.


Materials:
(Soup base that I made today)
Dashi stock 5 cups
Soy sauce 1.5 tbs
Mirin 1.5 tbs
Sake 1.5 tbs
Brown sugar 1 tbs
Yuzu powder 1/2 tbs
Japanese mustard to taste

Food items:
Daikon (radish)
Tofu
Various kinds of konnyaku
Various kinds of fish cake
Egg
Mini sausages
Mochi-kin
(Pretty much whatever you like)


Procedure:
1) Peel the daikon skin. Cut into big pieces, rougly 3 cm thick. Boil a pot of rice water, and boil the daikon for 15 minutes. (I saw in a few recipes that you need to boil daikon with rice water. Not sure why. I did put in like a tbs of rice in the pot)

2) For the big black piece of konnyaku, put in boiling water for about a minute or two. Then cut in quater. (I cut into triangles)
3) Boil eggs, then peel the shell off.

4) Put all the soup base ingredients (except for Japanese mustard) into a big pot. Bring to boil, taste the soup, and see if the flavour is good enough for your taste. If it’s not strong enough, add more soy sauce, mirin and sake.
5) Put the daikon, konnyaku and eggs into the pot to boil first, as these 3 items require longer time for the flavor to get in. Let it cook for 30 minutes (at least).

6) Put the remaining food items in the pot. When they’re ready, then your oden is ready!


Result:


Discussion:
1) I find that 30 minutes isn’t quite enough for the daikon. So I’m leaving more daikon in the soup overnight. I’ll try it again tomorrow. I think it should taste better.

2) I thought I have bought Japanese mustard… but it turned out that it was actually ginger paste!!! I didn’t know that it was ginger paste until I squeezed it out. Sigh… (well both mustard and ginger paste packages are yellow… next time I know I should READ instead of just picking a yellow box)

3) I really like the yuzu taste in the soup! I think it’s like the “secret ingredient” for oden. Of course if you have fresh yuzu it’ll even taste better! (I forgot where I read about the Yuzu… I tasted the soup before and after I added the Yuzu. The soup with the yuzu powder tastes definitely more like those in restaurants.)

Wednesday, February 3, 2010

Steamed Eggplants with Garlic


Experiment: Steamed Eggplants with garlic

Introduction:
I’ve always liked eggplants. I used to just panfry eggplants and drizzle sesame sauce on top. One day I was talking with my co-worker about eggplants, she told me that she usually steam eggplants with lots of garlic. She said it’s super easy and it tastes very good… Easy and Yummy sound good to me! so I decided to give it a try.
Materials:
Eggplant
Lots of minced garlic
2 tbs chopped green onion
Soy sauce
Sesame oil

Procedure:
1) Cut the eggplant into small pieces. Put them on a plate. Put lots of garlic on top of the eggplants, and steam.
2) Mix soy sauce and sesame oil together.

3) When eggplants are done, put the chopped green onion on top, then pour the soy sauce and sesame oil mix on the eggplants. DONE!


Result:


Discussion:
1) I usually only use this Garlic+Green Onion+Soy Sauce+Sesame oil combination for seafood. When I ate this eggplant… for a moment I thought I was having seafood!
2) Love this easy dish! Very easy and quick and yummy!

Monday, February 1, 2010

Tofu Steak with mushrooms (豆腐ステーキきのこあん)


Experiment: Tofu Steak with mushrooms (豆腐ステーキきのこあん)

Introduction:
I’ve been craving tofu lately. I flipped through my recipe books and found this Tofu Steak with mushrooms. Yay! One dish with 2 of my fave food…


Materials:
1 pack tofu
1 pack enoki mushroom
1 pack maitake mushroom
1 tbs chopped green onion

Sauce:
1 tbs oyster sauce
1 tbs soy sauce
2 tbs sake
1/2 cup water
1.5 tbs corn starch
Salt, white pepper


Procedure:
1) Cut the tofu into big pieces.

2) Wash the 2 types of mushrooms. Cut the bottom part of the enoki mushroom, then cut the remaining part in half. Cut the maitake mushroom into small pieces.

3) Heat a frying pan. Add oil into pan, and put the tofu in. When one side is done, flip over to the other side. Put the tofu on plates when both sides are golden.

4) In a small pan, stir fry the mushrooms. When the mushrooms are half done, put the oyster sauce, soy sauce, sake and water in. Stir well. Sprinkle salt and white pepper as you like. When the sauce is ready, put the corn starch in. Mix well until sauce is thicken.

5) Put the mushroom sauce on top of the tofu. Sprinkle the green onion on top of the mushroom sauce.


Result:


Discussion:
1) It’s a quick and yummy dish!

2) You can try other types of mushroom as well. I just happend to have enoki mushroom and maitake mushroom at home. By the way, it’s my first time trying maitake mushroom… the texture is like oyster mushroom, but maitake has quite a “woody” taste. Interesting! Definitely will try again (too bad it’s quite expensive… otherwise I’ll buy it more often.)

3) Acutally 1 pack of tofu is not enough for me and Mr. Clam… I think I’ll make 2 packs of tofu!