Sunday, April 4, 2010

Kimchi (Part 1)

Experiment: Kimchi

Introduction:
I saw a few Kimchi recipes on a few blogs a while ago. I never knew that I could make Kimichi at home! So after I saw those recipes, and knowing that the ingredients are quite accessible, I decided to give it a try. I modified the recipe a bit (because I don’t have some ingredients), but hopefully it’ll still taste good!

Materials:
1/2 Korean cabbage (about 500g)
1/2 Korean raddish
1/4 onion, chopped
2 tbs chopped ginger
2 tbs chopped garlic
4 bunches of green onions
4 tbs salt

Kimchi sauce:
6 tbs crushed red pepper (or red pepper powder)
6 tbs fish sauce
1 tbs sesame oil
1/2 tbs sugar
2-3 tbs sesame

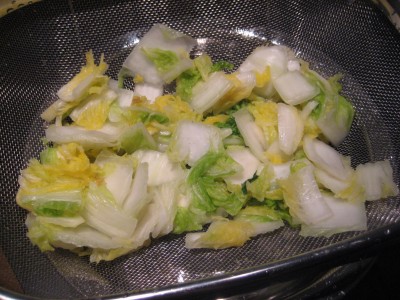
Korean Cabbage:


Crushed red pepper:


Procedure:
1) Cut the cabbage into small pieces. (OR just leave the leaves as they are. There are many different ways.)

2) Put the cabbage into a big bowl, sprinkle the salt onto the cabbage. Mix the cabbage and the salt together until the cabbage leaves are soft. I think I left the cabbage in the big bowl for roughly an hour.


3) Wash away the salt from the cabbage leaves. Taste the cabbage leaves (the acutal leaf part) and see if it’s still salty. Keep washing (or soak the cabbage in cold water) the leaves until it’s not salty. And then air dry the cabbage for about 2 hours.


4) While you’re drying the cabbage, it’s time to prepare the other ingredients. Cut the green onions into 2-inches pieces. Cut the Korean raddish in half. Grate half of the radish, and thinly slice the other half of the raddish.

From top left clockwise: chopped onions, chopped ginger, thinly sliced Korean raddish, grated Korean Korean raddish, choped garlic and green onoins

5) Mix all the Kimchi sauce ingredients together in a bowl. Taste it and see if you like it. You can add more crushed red pepper if you like it really spicy.


6) When the cabbage leaves are dry, then you’re ready for the mixing! Simply put all the ingredients in a biiiiiiig bowl, and mix them together. Mix them well! It’ll start to look like kimchi. 
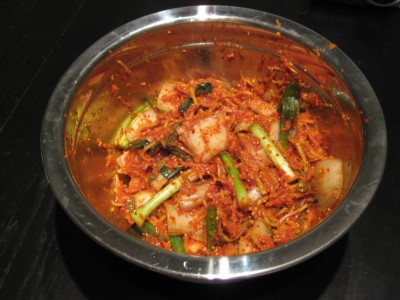
 

7) Put the mixed kimchi in a container.


8) Put saran wrap on top of the kimchi. Cover the lid, then put it in the fridge for 7 days.


Result:
It’s not ready yet! I’ll post it again after 7 days… but… OH! I’ll be out of town… so maybe I’ll post it after I come back… hehe!

Discussion:
1) I didn’t know that the leaves would shrink so much… I think I should’ve used ONE whole cabbage instead of half.
2) I saw in a recipe that you can add shrimp paste in the kimchi sauce as well. Too bad I don’t have it at home! I really like the smell of shrimp paste.

3) You can also add grated apple, thinly sliced cuccumber, and thinly sliced carrots in the kimchi as well… I don’t have it at home. But I’ll definitely try them next time!

Tuesday, March 16, 2010

Basic Japanese style Hamburger patty (ハンバーグ)


Experiment: Basic Japanese style Hamburger patty


Introduction:
Hamburger patty is a very common dish in Japan. You can find recipes in many Japanese magazines or books. There’s this recipe book that I have that shows you what can go with you hamburger patties. Well… before I try those fancy recipes, I think I need to make sure that my hamburger patties taste good first. I’ve made it 4 times before… the first and third time tasted well, but the second and forth time were really bad. Not sure why! I guess odd numbers are good for me? Anyways… I tried a simpler recipe this time… and guess what, this 5th time that I make hamburger patties was good! (it’s odd number again though) Hmm… not sure about next time though… hahahaha!
Materials: (make 6 patties)
300 g minced meat (beef or pork or mixed)
1/2 onion, chopped
50g bread crumbs
1 egg
1 clove of garlic, minced
Chopped ginger
1/2 soy sauce
1/2 sake
Black pepper

Procedure:
1) Put the chopped onion, garlic, ginger, bread crumbs and egg in a mixing bowl, and mix well.

2) Put the meat in 1), and add soy sauce, sake and black pepper. Mix well.

3) Divide the mixture in 6. Put a portion in your hand. Make it into a round shape. Throw the patty between your hands to make the air out. (This prevents the hamburger patty from falling apart when you cook it)

4) Put the hamburger patties into the fridge for an hour for the flavour to come out. (Optional step)

5) Pan fry the patties or bake the patties. Depends on what you wanna make.


Result:


Discussions:
1) I use worchester sauce for the patties this time. It tasted well!

2) It’s better to chop the onion REALLY FINE. It’s easier for you to make the patties round. This time I made the onions a bit too big, so it acutally didn’t mix well with the meat… and then I couldn’t make nice round shape patties.

Monday, March 15, 2010

Miso Soup with Clams


Experiment: Miso Soup with Clams

Introduction:
I have always liked seafood, especially clams. I always see Japanese soup with clams in it, but I had never tried to make it. Since clams is on sale, so I decided to buy 1/2 pound and make this miso soup.
Material: (serve 2)
2 tbs Miso paste
2 cups of water
1/2 lb clams (I bought 8 clams)
2 tbs chopped green onion

Procedure:
1) Soak the clams in water for 30min – 1 hour. Rub the clams against each other.

2) Boil the water. Put the miso paste into the water, and dissolve it.

3) When the miso paste is well dissolved into the water, put the clams in. When the clams open, put the chopped green onion in. It’s ready!

Discussion:
1) I didn’t take many pictures coz I was being lazy…

2) It’s pretty easy to make… the only trouble is to get fresh clams… I usually do grocery shopping once a week… which means I can only have it once a week at most… acutally, can you put the clams in the fridge? Not sure if it’s ok…

Sunday, March 7, 2010

Kimchi, pork and mochi okonomiyaki


Experiment: Kimchi, pork and mochi okonomiyaki


Introduction:
I have always liked okonomiyaki. When I first heard about okonomiyaki few years ago, I knew that people usually use pork or seafood as the main ingredients. I then usually only used pork or seafood (or just cabbage) as the main ingredients, and nothing else. Well, I wasn’t that adventurous back then…

When I went to Osaka, Japan last November, I went to a popular okonomiyaki restaurant. WOW! They had lots of different types of okonomiyaki and I didn’t even THINK of! We ordered a set meal that included the 3 most popular okonomiyaki in that restaurant – house special that included 6 or 8 ingredients, Yamaimo okonomiyaki (okonomiyaki that were made with yamaimo, not flour), and green onion-pork-kimchi okonomiyaki. They were all very delicious! I was so surprised that you could use so many different ingredients for okonomiyaki. After I came back from Japan, I started trying different ingredients in my okonomiyaki. Today, I decided to try a kimchi, pork and mochi combination.

Materials:
1 cup Okonomiyaki powder
1/2 cup water
1 egg
Lots of thinly sliced cabbage
1/4 cup chopped green onion
Thinly sliced pork (put as much as you like)
Chopped kimchi (just put as much as you like)
2 mochi, sliced

Condiments:
Bonito flake
Seaweed flake
Mayonnaise
Okonomiyaki sauce

Procedure:
1) Mix the okonomiyaki powder, water and egg together. Mix it well so that there’s no clump.

2) Put the chopped green onion, cabbage, mochi and kimchi in the batter, and mix well.

3) Heat up a frying pan and put some oil in. Then put the pork in and stir fry a bit. Put the batter in, then mix with the pork.

4) Make the batter into a round shape. Remember not to make it too thick! Turn the heat to medium.

5) When the bottom’s almost ready, i.e., you can flip the okonomiyaki, flip the okonomiyaki.

6) Check if the centre’s cooked, use a chopstick/skewer to poke the centre of the okonomiyaki, if the centre’s dry, it means it cooked.

7) Put the okonomiyaki on a plate, then put the condiments on as you like.

Result:

(Without the condiments)


Discussions:

1) Not sure if it’s because the kimchi has sauce in it, which makes the batter more watery, I find that this okonomiyaki is harder to flip.

2) AND not sure if it’s because of the mochi, which sticks to the pan when melted, it’s not easy to flip the okonomiyaki.

3) It actually tasted VERY GOOD! The mochi makes the okonomiyaki very chewy, the pork is quite crunchy, and the kimchi… I put too much kimchi in this time, Mr. Clam found it a bit spicy… I think I’ll put less kimchi in next time.

4) A few other ingredients that I really like with okonomiyaki are: corn, chopped konnyaku, ekoni mushroom. Give them a try! You’d be surprised! :)

Monday, March 1, 2010

Tofu with thousand year egg (皮蛋豆腐)


Experiment: Tofu with thousand year egg (皮蛋豆腐)

Introduction:
Few weeks ago, my co-worker brought an thousand year egg to office, and said that she’ll have that and tofu for lunch. I was like, “REALLY? I have always heard about it but never tried it!” At lunch time, she cracked the thousand year egg, sliced it, and put it on top of the tofu. She poured some soy sauce on top… and TaDa! There’s a dish of Tofu with Thousand Year Egg. The whole process took like maybe… 2 minutes? It was so simple, yet it tasted so good. So tonight, I decided to give it a try, and make my own version of it.


Materials:
1 box of soft tofu
1 thousand year egg
Bonito flakes
Sliced red ginger
Soy sauce
Sesame oil

Procedure:
1) Take the tofu out from the package, put it on a plate. Steam it if you like, or you can serve it cold.

2) Crack the thousand year egg, peel it, and slice it. Put it on top of the tofu.

3) Put as much bonito flakes as you like on top of the tofu and thousand year egg.

4) Put some sliced red ginger on top of the bonito flakes.

5) Pour soy sauce on top, then sesame oil. DONE!


Result:


Discussion:

1) In case you’re wondering what a thousand year egg is, it looks like this:


Picture taken from Wikipedia.org


You don’t need to cook the egg. When you crack it open, it looks like a hard boiled egg, except that it’s black. And if you’re lucky enough to get good eggs, the yolk would still be quite liquidy, like a soft boiled egg, as shown in the above picture. OH btw, thousand year eggs are made with duck eggs, not chicken eggs.


2) There are many versions of this dish. Some people like to put coriander instead of bonito flakes, and some like to put chopped green onions on top. Well basically you can put whatever you like on top of the tofu!

Thursday, February 25, 2010

Pork and Kimchi Rice Bowl (豚キムチ丼)


Experiment:
Pork and Kimchi Rice Bowl (豚キムチ丼)


Introduction:
Last weekend, Mr. Clam and I went Downtown to watch some Olympic stuff. We went in a restaurant called “Ebi Ten” fo food. There I tried a rice bowl called “Buta-Kim,” and I REALLY LIKED it! When I was eating it, I thought to myself… “It shouldn’t be too hard to make at home…” So I gave it a try tonight.


Material: (serve 2-3)
200g thinly sliced pork
100g kimchi
1/4 onion, thinly sliced
1/2 tbs chopped garlic
2 tbs chopped green onion
Oil
Mayonnaise
Egg (optional)

Rice
Small pieces of lettuce

Sauce:
1 tbs mirin
1 tbs sake
1/2 tbs soy sauce
1/4 tbs sesame oil
1/2 tbs brown sugar
Salt

Procedure:
1) Mix all the sauce ingredients in a small bowl.

2) Heat up a frying pan, put some oil and chopped garlic in. Then put the onion in. Stir fry until the onion is brown and soft.

3) Put the pork in. When the pork has changes colour, put in 1) and the Kimchi. Stir fry until the pork is well cooked.

4) Now it’s time for the rice. First put the rice a rice bowl, then put some lettuce on top. Ok, now it’s time for the trick – MAYONNAISE! I never thought of putting mayonnaise in a rice bowl until I tried it at Ebi Ten. So remember to put some mayonnaise in your rice bowl! It makes it taste SO much better! 


5) Now, if you like eggs like me, you can put a sunny side up egg on your lettuce. If you don’t like eggs, then you can skip this.

6) Of course, now you’ll need the kimchi pork! Just simply put the pork on the lettuce, and green onion on top of the prok. Viola! There’s your Pork and Kimchi rice bowl!


Results:

Without egg:
 

With sunny side up egg:

Discussions:
1) It was suprisingly good! And the good thing is it doesn’t take long to make! I think from cutting the onion to the finished product, it took me less than 20 mins.

2) I think I’ll start to put mayonnaise on EVERYTHING now coz it tastes so good!


Wednesday, February 24, 2010

Stir Fry Daikon Cake with XO Sauce


Experiment: Stir fry Daikon Cake with XO sauce


Introduction:
I tried to make the Daikon Cake again. This time I tried it with Rice Flour:Corn Startch 2:1 ratio, but then... it turned out to be quick firm. Still not the texture I want. BUT! Since this is so firm, it's actually quite good for stir frying. So today I tried stir fry daikon cake with xo sauce - a common dish now in many dim sum restaurants.

Materials:
Daikon cake
A bunch of bean sprout
2 -3 tbs XO sauce (depends on how spicy you like it)
1 tbs of chopped garlic
Chopped green onions
Pepper, salt to taste
Oil

Procedure:
1) Cut the Daikon Cake into cubes.


2) Heat up a frying pan, then some oil, and then add the chopped garlic. When the garlic turns golden brown, put the bean sprouts in and stir fry for a bit.


3) Put the daikon cake in and stir fry with the bean sprout. Then put the XO sauce in. Add salt and pepper to taste. Mix well.

4) When the daikon cake is well cooked, put everyone on a plate and sprinkle grenn onions on top.

5) Time to eat!


Result:


Discussion:

1) Just in case you didn't know what XO sauce is, it's a seafood sauce that's usually made of chilli pepper, dried scallope, dried shrimp etc. It's usually spicy. You can find it in most Asian supermarkets.

2) I think I put too much oil from the XO sauce in... so the whole dish turned out to be quite greasy. Not good.

3) Hmm... About the Daikon Cake I think I'll try a Rice flour:Corn Starch 3:1 ratio... Wish I'll succeed next time!